Course Code: BP101T
Unit I Overview
Course: BP101T – Basics of Python Programming for Pharmaceutical Sciences (Theory).
Unit I: Introduction to Python programming.
Python is a general-purpose programming language. A program is a sequence of instructions that processes information. Python supports calculations, text processing and reusable tools; these foundations later support pharmaceutical data analysis and visualisation.
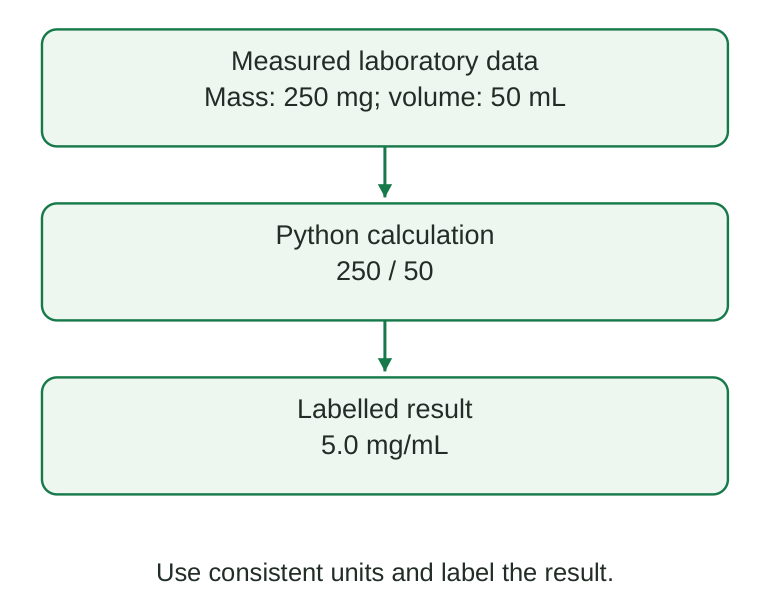
Diagram explanation: Measured quantities enter the calculation; dividing mass by final volume produces mass concentration. The numerical result must be reported with mg/mL units.
- Measured laboratory data: mass = 250 mg; volume = 50 mL.
- Python calculation: 250 / 50.
- Labelled result: 5.0 mg/mL.
- Use consistent units and label the result.
Topics Covered – Unit I Coverage Map
| Syllabus requirement | Sections in these notes |
|---|---|
| Install Python; Jupyter, PyCharm and VS Code; IDE advantages | 1.1-1.3 |
| Variables; integers, floats, strings and booleans | 1.4-1.5 |
| Type casting; arithmetic, comparison and logical operators | 1.6-1.8 |
| Input and output operations | 1.9 |
| Basic string operations and manipulation | 1.10-1.12 |
| Standard/third-party libraries; install and uninstall | 1.13-1.14 |
Why this matters in pharmaceutical sciences
- Laboratory records: represent sample identifiers, measurements, quantities and flags in suitable types.
- Routine calculations: perform unit conversions and concentration arithmetic with named quantities.
- Text consistency: remove accidental spaces and standardise fictitious batch identifiers.
A computer applies the instructions it is given. A correctly executed program can still use a wrong formula, wrong unit or wrong input. Interpretation therefore remains part of the scientific task.
Scope of Unit I
This unit establishes basic programming. Conditional statements, loops and user-defined functions are developed in Unit II; detailed data structures, files and plotting follow later. All datasets and batch identifiers here are illustrative.
Official Software Download and Setup Links
| Software or tool | Official link | Purpose |
|---|---|---|
| Python | Download Python | Install the Python interpreter for your operating system |
| Visual Studio Code | Download VS Code | Install the code editor |
| Microsoft Python extension | Install Python extension for VS Code | Add Python language support to VS Code |
| Microsoft Jupyter extension | Install Jupyter extension for VS Code | Work with notebook files in VS Code |
| PyCharm | Download PyCharm | Install the Python IDE |
| Jupyter Notebook | Official Jupyter installation instructions | Install Notebook through the selected Python environment |
Python is the interpreter. VS Code and PyCharm are coding environments. Jupyter Notebook is installed as a package and runs notebook code through a selected kernel. Follow the relevant setup workflow below.
1.1 Installing Python and verifying the interpreter
An interpreter is the software that executes Python code. Installing an editor alone does not necessarily install a usable Python interpreter. Use an official Python 3 distribution suitable for the operating system.
Installation procedure
- Step 1: Obtain Python: open the official Python download page and choose the supported installer or install-manager route for the operating system. Use the official OS-specific instructions; installer screens can change.
- Step 2: Complete setup: follow the installer instructions. When a Windows installer offers a PATH option, enabling it makes command-line access easier. The Windows Python launcher/install manager can also provide the py command.
- Step 3: Reopen the terminal: environment changes may not appear in an already-open command window.
- Step 4: Verify installation: run the appropriate version command below. A Python 3.x version message indicates that this command resolves to an interpreter.
Terminal commands – not Python statements
py –version # Common alternative on Windows: python –version # Common command on macOS/Linux: python3 –versionUse the verified interpreter command consistently. On macOS/Linux, follow the official installer or the Linux distribution package-manager instructions; do not replace the operating system Python manually.
Create and run the first script – step by step
Step 1: Create a practice folder. Make a folder called BPharm_Python, for example in Documents. Store the practice files in this folder.
Step 2: Open a plain-text editor or IDE. Create a new file and type the program below. Use straight quotation marks; do not use a Word document to save code.
print( “Hello, pharmaceutical sciences!” )Output
Hello, pharmaceutical sciences!Step 3: Save the file. Save it as hello.py inside BPharm_Python. Check that the extension is .py, not .py.txt. If using Notepad, choose All files when saving.
Step 4: Open a terminal in that folder. In Windows File Explorer, open BPharm_Python, type cmd in the address bar and press Enter. In an IDE, open that folder and use its terminal. The terminal accepts commands for running saved programs.
Step 5: Execute the script. Type py hello.py on Windows, or use python hello.py / python3 hello.py according to the verified interpreter command. Press Enter. These commands go in the terminal, not inside hello.py.
Step 6: Check the result. The greeting shown in the Output box should appear. If it does not, check the filename, current folder and quotation marks. Edit the greeting, save again and rerun to see the change.
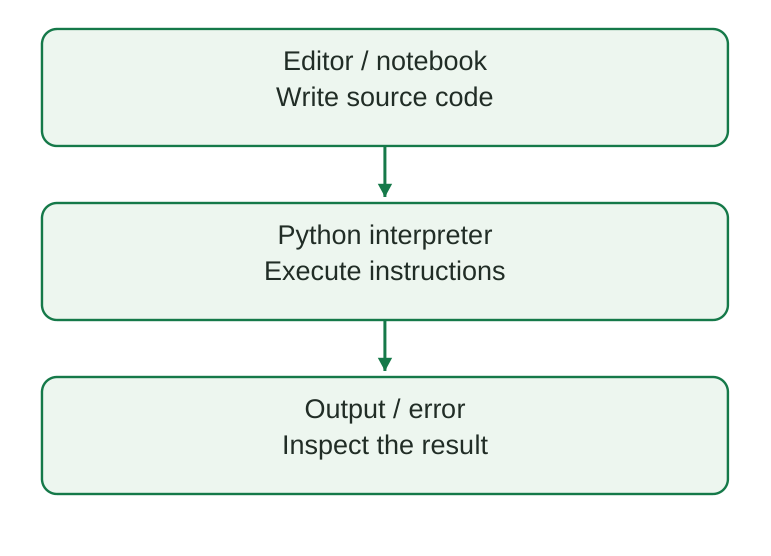
Diagram explanation: The editor stores the instructions, the interpreter runs them, and the output area displays either the result or an error. Installing an editor alone does not replace Python.
Common installation difficulties
- Command not found: check installation, command choice and PATH; reopen the terminal.
- File not found: check the current folder and filename.
- Wrong version: the editor may have selected a different interpreter from the terminal. Verify both.
Memory aid
Editor = write; interpreter = execute; terminal = enter commands. These are three distinct roles.
1.2 IDEs, notebooks and text editors
IDE means Integrated Development Environment: tools for editing, running and debugging code in one workspace. A plain text editor primarily edits text; additional tools can turn an extensible editor into an IDE-like environment. Jupyter provides an interactive notebook environment.
| Feature | Plain editor | IDE / notebook environment |
|---|---|---|
| Syntax highlighting | May be available | Usually available |
| Run code | Often requires a separate terminal | Integrated run action or code cells |
| Debugging | Usually external | Breakpoints and variable inspection in IDEs |
| Completion and diagnostics | Limited or extension-dependent | Context-aware assistance |
| Project/interpreter selection | Usually managed separately | Integrated environment selection |
| Narrative + results | Separate document | Notebook cells combine code, text and results |
Jupyter Notebook
A notebook stores code cells, explanatory Markdown cells and outputs in an .ipynb file. A selected kernel executes its code. It is useful for explaining a laboratory calculation beside its result. Use Shift+Enter to execute the current cell and move onward.
Official installation page: Install Jupyter Notebook.
The complete first-notebook workflow is explained in Section 1.3.
PyCharm
This Python-focused IDE organises projects, runs scripts, offers code inspections and provides debugging. Follow this beginner workflow.
Step 1: Install. Download PyCharm from the official PyCharm download page and follow the installer for the operating system. Install Python separately first.
Step 2: Create a project. Open PyCharm and choose New Project (or File > New Project). Choose a location and name such as BPharm_Python.
Step 3: Choose the interpreter. Select the installed Python 3 as the base interpreter and let the project use a virtual environment. This keeps its packages separate. Wait for project setup to finish.
Step 4: Add a Python file. In the Project panel, right-click the project folder, choose New > Python File, and name it hello. PyCharm creates hello.py.
Step 5: Type and save. Enter print(“Hello”) and save the file.
Step 6: Run and check. Right-click the file and choose its Run action. The Run tool window should show Hello. Menu wording can vary between releases.
Visual Studio Code
VS Code becomes a Python workspace through its Python extension. Python itself must be installed separately.
Step 1: Install VS Code. Download VS Code from the official VS Code download page, complete installation and open the application.
Step 2: Install Python support. Open the Extensions panel, search for Python, and install the Python extension published by Microsoft.
Step 3: Open the project folder. Choose File > Open Folder and open BPharm_Python. This workspace contains the saved programs.
Step 4: Select Python. Open the Command Palette with Ctrl+Shift+P (macOS: Cmd+Shift+P). Choose Python: Select Interpreter, then select the intended Python 3 environment.
Step 5: Create and save code. Make a new file, save it as hello.py, and type print(“Hello”).
Step 6: Execute. Use Run Python File in Terminal. Check that the terminal prints Hello. For .ipynb notebooks, also install the Microsoft Jupyter extension and choose a kernel.
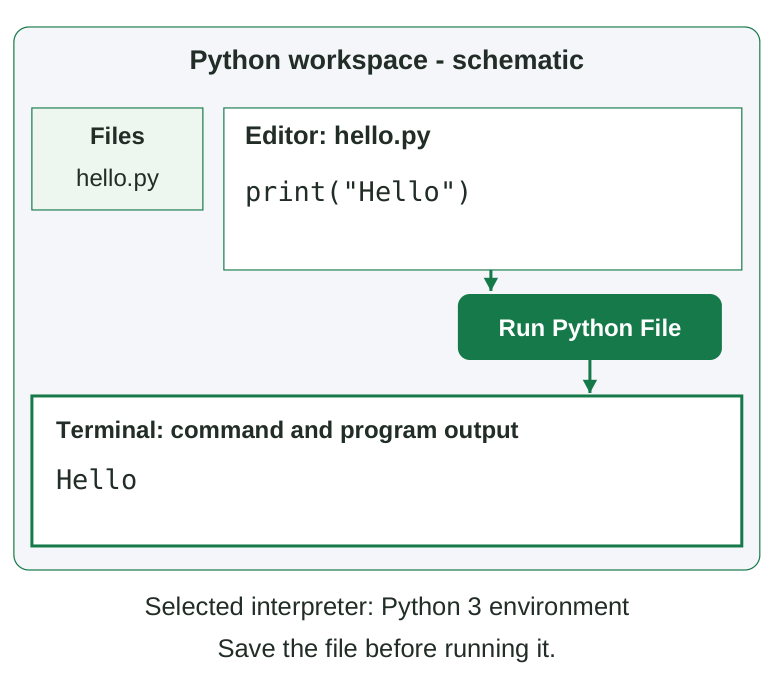
Diagram explanation: The editor contains the saved source code. The Run action sends that file to the selected Python interpreter; the terminal displays Hello. In VS Code, Run Python File in Terminal uses the terminal for results. Other IDEs may use a separate Run pane. This schematic explains roles rather than a version-specific screen layout.
- Files panel: hello.py.
- Editor: the saved Python source code.
- Run action: Run Python File.
- Terminal: command and program output.
- Selected interpreter: Python 3 environment.
- Save the file before running it.
| Task | Suitable starting environment |
|---|---|
| Explain a calculation with notes and output | Jupyter Notebook |
| Develop and debug a multi-file Python project | PyCharm |
| Edit Python alongside other file types | VS Code with Python support |
Advantages and limitations
Integrated tools reduce context switching, expose errors earlier and make debugging easier. They do not guarantee scientific correctness. A warning may identify a coding problem, while an incorrect conversion formula may still execute successfully.
Exam distinction
An IDE helps create and inspect a program. The selected interpreter determines which Python installation and packages execute it.
1.3 Setting up an environment and executing code
Jupyter: installation and first notebook
Step 1: Prepare Python. Confirm that the Python version command works. Open a terminal in BPharm_Python. Use the intended interpreter; a virtual environment is explained in Section 1.14.
Step 2: Install Notebook. Follow the official Jupyter installation instructions. Run the first command below and wait for installation to finish. Internet access is needed to download the package. Replace python with py or python3 according to the verified interpreter command.
Terminal – install Notebook
python -m pip install notebookStep 3: Launch. Run the command below. Jupyter normally opens a browser page. If it does not, open the local URL printed in the terminal. Keep that terminal running during the notebook session.
Terminal – launch Notebook
python -m notebookStep 4: Create a notebook. Use the browser interface to create a new Python notebook and select an available Python kernel. Rename it first_practice.ipynb.
Step 5: Enter and execute code. In a code cell, type print(“Hello”), then press Shift+Enter. The word Hello should appear below the cell.
Step 6: Save. Use the notebook Save command. The .ipynb file contains cells and saved outputs; it is different from a .py script.
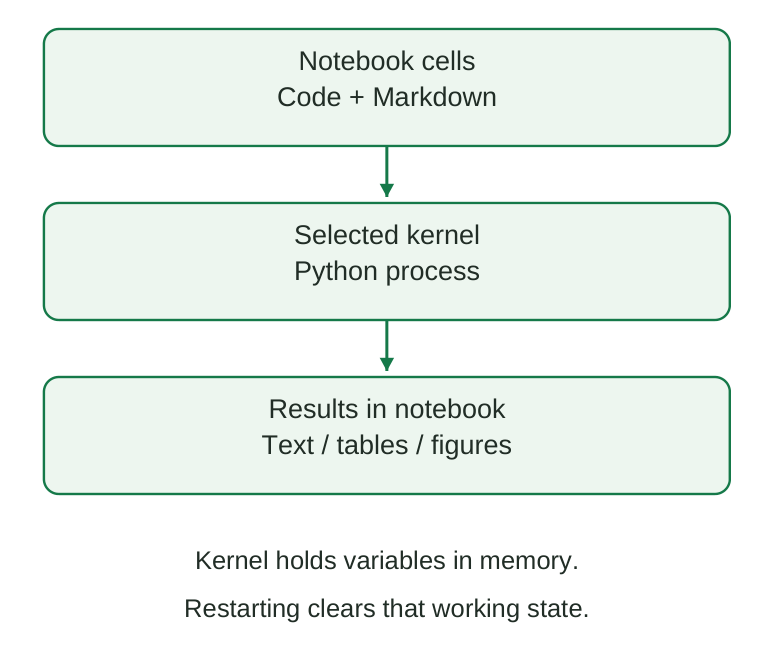
Diagram explanation: The kernel is the active Python process. It executes notebook cells and retains their variables. Restarting it clears that state; running all cells in order checks reproducibility.
- Notebook cells contain code and Markdown.
- The selected kernel is the Python process.
- Results appear in the notebook as text, tables or figures.
- The kernel holds variables in memory.
- Restarting clears that working state.
Execution order matters
Suppose one cell assigns count = 10 and another prints count. The second cell requires the first cell to have executed. Running cells out of order can leave old values in memory.
Step 1: Put count = 10 in the first code cell.
Step 2: Put print(count) in the next cell.
Step 3: Run the first cell and then the second; expect 10.
Step 4: Restart the kernel and run all cells from top to bottom to check that the saved notebook works without old values.
Interactive mode versus script mode
| Mode | How it behaves | Typical use |
|---|---|---|
| Interactive shell | Executes entered statements; a bare expression can display its value | Explore one expression |
| Script (.py) | Executes saved statements; use print() to display results | Repeat a complete calculation |
| Notebook (.ipynb) | Executes cells in the selected kernel and retains outputs | Combine explanation and experiments |
Python syntax essentials
- A statement performs an action; an expression produces a value. In x = 2 + 3, the right side is an expression and the complete line is an assignment statement.
- A comment begins with # outside a string and continues to the end of that line. Use comments to explain units and purpose.
- Python is case-sensitive. Use consistent spelling and ordinary straight quotation marks in code. Indentation defines blocks when control structures are introduced later.
SyntaxError: invalid grammatical structure.
NameError: an unavailable name.
TypeError: an operation on unsuitable types.
Read the final error message and the indicated source line before changing code.
1.4 Variables, assignment and meaningful names
A variable name refers to an object. Assignment evaluates the right-hand side and binds the name on the left to the resulting object. Python does not require a declaration such as “integer count” before the first assignment.
batch_count = 24 batch_count = batch_count + 1 print(batch_count)Output
25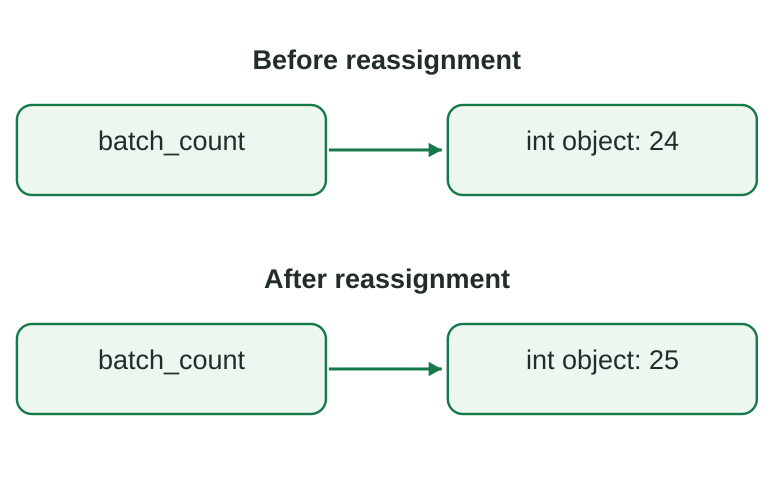
Diagram explanation: The same name refers to 24 before the update and 25 after it. Reassignment changes the binding; it does not change the mathematical meaning of the earlier integer.
Identifier rules
- Names can contain letters, digits and underscores, but cannot start with a digit. For beginner programs, use simple English letters and underscores.
- Spaces and hyphens cannot be part of a variable name. Python keywords such as class cannot be ordinary variable names.
- Names are case-sensitive: sample_id and Sample_ID are different names. Prefer descriptive snake_case, such as mass_mg or volume_ml.
| Name | Assessment | Reason |
|---|---|---|
| sample_count | Valid and descriptive | Letters and underscore |
| volume_ml | Valid and unit-aware | Records the unit explicitly |
| 2samples | Invalid | Begins with a digit |
| sample-count | Not one identifier | Hyphen is subtraction |
| class | Invalid as a variable name | Reserved keyword |
| x | Valid but less descriptive | Purpose is unclear without context |
Assignment is not a mathematical equation
count = count + 1 reads the old value, adds one and rebinds count. It does not assert that the two sides are equal. = assigns; == compares. Augmented assignment such as count += 1 expresses the same update for this integer example.
If copy_mg = mass_mg is assigned when mass_mg is 250, then reassigning mass_mg = 300 leaves copy_mg referring to 250. A variable may later refer to a different type, but avoid changing its meaning unexpectedly.
Good practice
Do not name a variable print, input, str or int: this hides a built-in name. Use quantity names with units and record what each value means.
1.5 The four core data types
| Type | Meaning | Illustrative value |
|---|---|---|
| int | Whole-number quantity without a fractional part | sample_count = 12 |
| float | Binary floating-point numeric value | volume_ml = 12.5 |
| str | Text represented as a sequence of Unicode characters | batch_id = “B07” |
| bool | Truth value: True or False | label_checked = True |
Choosing a type by meaning
Use int for a count, float for a measurement that may be fractional, str for an identifier or description, and bool for a two-state flag. “12” is text even though it contains digits. An identifier such as “007” should usually remain text so that leading zeros are preserved.
count = 12 volume_ml = 12.5 batch_id = “007” label_checked = True print(type(count).__name__) print(type(volume_ml).__name__) print(type(batch_id).__name__) print(type(label_checked).__name__)Output
int float str boolIntegers and floats
Python integers can grow beyond a fixed 32-bit range, subject to available resources. A float represents a finite-precision approximation to many decimal values. The display 5.0 remains a float even though its numerical value is a whole number.
print(0.1 + 0.2) print((0.1 + 0.2) == 0.3) print(f”{0.1 + 0.2:.2f}”)Output
0.30000000000000004 False 0.30Formatting changes the displayed text, not the underlying value. For approximate numeric comparison, math.isclose() can be used with suitable tolerances. Decimal arithmetic is introduced through the standard-library example later.
Strings and booleans
Single and double quotation marks both create strings. True and False are Boolean literals with capital initials. bool is a subclass of int, so True can act numerically as 1 and False as 0; use them primarily for logical meaning rather than counts.
Memory aid
Count -> int; measure -> float; label -> str; yes/no flag -> bool. This is a starting guide; the meaning of the data determines the final choice.
1.6 Type casting and conversion
Type casting means explicitly converting a value to another type. Built-in conversion functions include int(), float(), str() and bool(). Conversion succeeds only when the input is appropriate for the target type.
| Conversion | Result | Explanation |
|---|---|---|
| int(“24”) | 24 | Integer text becomes an integer |
| float(“12.5”) | 12.5 | Decimal text becomes a float |
| str(250) | “250” | Number becomes text |
| int(3.9) | 3 | Fraction truncated toward zero |
| int(-3.9) | -3 | Truncation is not floor division |
| float(8) | 8.0 | Integer becomes a float |
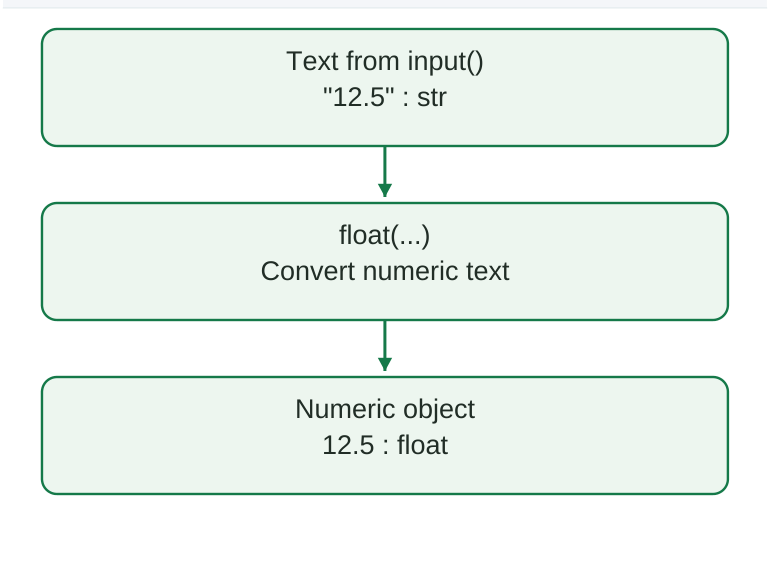
Diagram explanation: Numeric-looking input begins as text. float() converts suitable numeric text to a number before arithmetic. Text containing a unit, such as “12.5 mg”, needs cleaning or parsing first.
Automatic numeric conversion
In arithmetic between an integer and a float, the integer is converted for the floating-point operation: 2 + 0.5 gives 2.5. Python does not automatically convert arbitrary numeric text during arithmetic: “2” + 3 raises TypeError.
Conversions that fail
| Expression | Error / concern | Explanation |
|---|---|---|
| int(“12.5”) | ValueError | Not integer text; float conversion is different |
| float(“12.5 mg”) | ValueError | The unit suffix is not numeric syntax |
| int(“batch-A”) | ValueError | Identifier text is not a number |
| str(12) + “3” | “123” | Text concatenation, not numeric addition |
Output
15 False False TrueImportant Boolean trap: bool(“False”) is True because the string is non-empty. bool() tests truthiness; it does not parse the English word False. Numeric zero and empty strings are false; non-zero numbers and non-empty strings are true.
Conversion checklist
Identify the source type; decide the target type; apply only justified cleaning operations; convert; inspect the result. Preserve original identifiers and measurements when they are needed for an audit.
1.7 Arithmetic operators and expression evaluation
| Operator | Meaning | Example and result |
|---|---|---|
| + | Addition | 7 + 3 = 10 |
| – | Subtraction | 7 – 3 = 4 |
| * | Multiplication | 7 * 3 = 21 |
| / | True division | 7 / 2 = 3.5 |
| // | Floor division | 7 // 2 = 3 |
| % | Remainder | 7 % 2 = 1 |
| ** | Exponentiation | 2 ** 3 = 8 |
Important division distinctions
For integer/float operands, / returns a float. // returns the floored quotient; its result is a float when a float operand is used. With negative values, flooring moves toward negative infinity. Therefore -7 // 2 is -4, whereas int(-3.5) is -3. A zero divisor in /, // or % raises ZeroDivisionError.
Precedence and parentheses
For the basic binary operators here, exponentiation binds before multiplication/division/floor division/remainder, which bind before addition/subtraction. Operators at the same arithmetic level usually group left to right; ** groups right to left. Parentheses explicitly control grouping.
print(2 + 3 * 4) print((2 + 3) * 4) print(2 ** 3 ** 2) print(-2 ** 2, (-2) ** 2)Output
14 20 512 -4 4Worked laboratory arithmetic
mass_mg = 250 volume_ml = 50 mass_g = mass_mg / 1000 concentration_mg_ml = ( mass_mg / volume_ml ) print(f”Mass: {mass_g:.3f} g”) print( f”Concentration: ” f”{concentration_mg_ml:.1f} mg/mL” )Output
Mass: 0.250 g Concentration: 5.0 mg/mLDerivation: 1 g = 1000 mg, so divide the numerical milligram value by 1000. Mass concentration = mass / solution volume; mg divided by mL gives mg/mL. This is fictitious laboratory arithmetic, not a medicine-dosing recommendation.
Memory aid
Use parentheses to express the scientific formula visibly. Evaluate units and magnitude as well as the Python result.
1.8 Comparison and logical operators
A comparison checks a relationship between values. In the numeric/text examples here, its result is a Boolean value. Use == for equality comparison; = is assignment.
| Operator | Meaning | Example |
|---|---|---|
| == | Equal to | 5 == 5 -> True |
| != | Not equal to | 5 != 3 -> True |
| < | Less than | 2 < 3 -> True |
| <= | Less than or equal to | 3 <= 3 -> True |
| > | Greater than | 2 > 3 -> False |
| >= | Greater than or equal to | 2 >= 3 -> False |
Logical operators: and, or, not
| A | B | A and B | A or B |
|---|---|---|---|
| False | False | False | False |
| False | True | False | True |
| True | False | False | True |
| True | True | True | True |
not reverses the truth value: not True is False, and not False is True. With Boolean inputs, and requires both conditions; or requires at least one. With general operands, and/or can return an operand rather than a bool.
count = 12 label_checked = True print((count > 0) and label_checked) print( (count == 0) or (not label_checked) ) print(10 <= count <= 20)Output
True False TrueShort-circuit evaluation
and stops when the left operand is false; or stops when the left operand is true. This can prevent evaluation of an unnecessary or invalid expression. In volume_ml != 0 and mass_mg / volume_ml > 0, the division is not evaluated if the volume is zero.
Common errors and reading order
- Write count == 10, not count = 10, when testing equality. Use parentheses to make compound conditions readable.
- Comparisons bind before not, then and, then or. The expression not count == 0 means not (count == 0).
- Text equality is case-sensitive: “Batch” == “batch” is False. Numbers and their text forms are different: 5 == “5” is False.
Interpretation of logical checks
These comparisons demonstrate programming logic. A check in an educational program is not evidence that a sample, treatment or clinical decision is valid.
1.9 Input and output operations
Input brings information into a program; output communicates a result. input(prompt) displays a prompt, reads a line and returns a string. A typed number therefore needs conversion before numeric arithmetic.
count_text = input( “Number of containers: ” ) count = int(count_text) print(“Recorded containers:”, count)Output after entering 12
Recorded containers: 12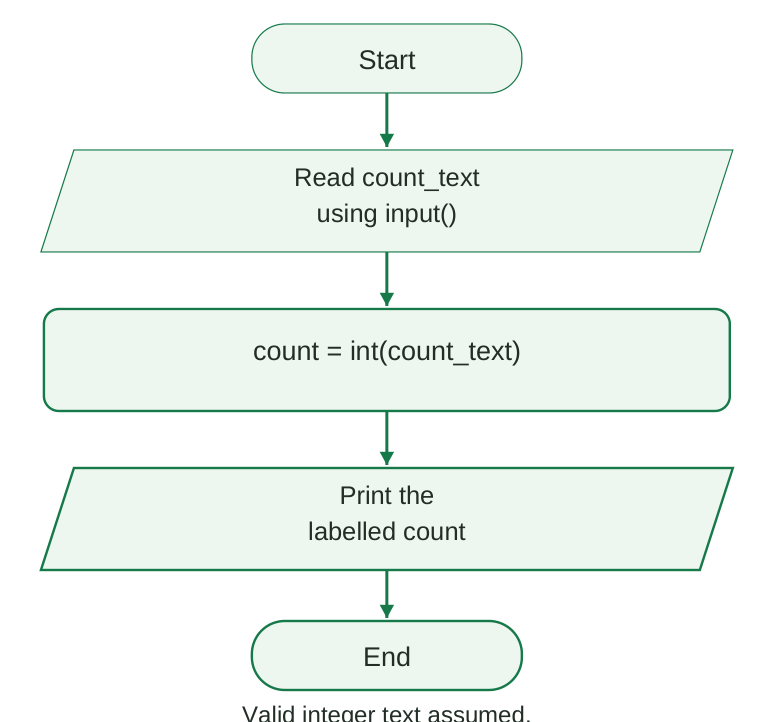
Diagram explanation: Read text first, convert it to an integer, then print the labelled count. The input/output parallelograms and process rectangle have different roles. This example assumes valid integer text.
- Start.
- Read count_text using input().
- Process count = int(count_text).
- Print the labelled count.
- End.
Using print() effectively
print() accepts multiple values, separates them with a space by default and ends with a newline. sep changes the separator; end changes what follows the output. Strings passed to print() do not display their surrounding quotation marks.
print(“Batch”, “B07″, sep=”: “) print(“Mass”, end=” = “) print(250, “mg”)Output
Batch: B07 Mass = 250 mgFormatted string literals (f-strings)
Prefix a string with f and place expressions inside braces. A format such as :.2f displays a number with two digits after the decimal point. Always label units in measured outputs.
volume_ml = 12.5 print(f”Volume: {volume_ml:.2f} mL”)Output
Volume: 12.50 mLIf the user types non-numeric text where int() is expected, conversion can raise ValueError. Exception-handling and repeated prompting are beyond this unit; the example assumes valid input rather than silently accepting any entry.
1.10 Strings: creation and basic operations
A string is text of type str. It can contain letters, digits, punctuation and spaces. A digit inside a string remains text. Python has no separate built-in character type: one character is a string of length one.
label = “Sample A” unit = ‘mg’ print(label, unit) print(len(label))Output
Sample A mg 8Quotation marks and escape sequences
| Form | Purpose | Example |
|---|---|---|
| Single or double quotes | Ordinary strings | “Batch A” or ‘Batch A’ |
| Triple quotes | Multiline text | Three matching quote characters at each end |
| \n | New line | “Batch\nA” |
| \t | Tab character | “Batch\tA” |
| \\ | Literal backslash | Use two backslashes in an ordinary string |
| \” or \’ | A quote inside matching quotes | Escape the inner quotation mark |
Output
Sample B07 Researcher’s labelConcatenation and repetition
prefix = “Batch-” number = “007” print(prefix + number) print(“-” * 5) print(“mg” in “250 mg”)Output
Batch-007 —– True+ joins strings; it requires compatible operands. To combine text and a number, use str(number), print() with separate arguments, or an f-string. * repeats a string an integer number of times. in checks whether a substring is present.
Strings are immutable
A character in an existing string cannot be replaced by assigning to its index. String operations create new strings. Rebinding the same variable name to a new result is allowed: label = label.upper(). The earlier string is not edited in place.
Meaning before manipulation
Leading zeros, spaces and letter case may be meaningful in identifiers. Standardise text according to a documented convention, and keep the original when necessary.
1.11 String indexing and slicing
Indexing retrieves one character. The first index is 0; negative indexing counts from the end, starting at -1. For a six-character string, valid positive indices are 0 through 5.
| Character | P | Y | T | H | O | N |
|---|---|---|---|---|---|---|
| Positive index | 0 | 1 | 2 | 3 | 4 | 5 |
| Negative index | -6 | -5 | -4 | -3 | -2 | -1 |
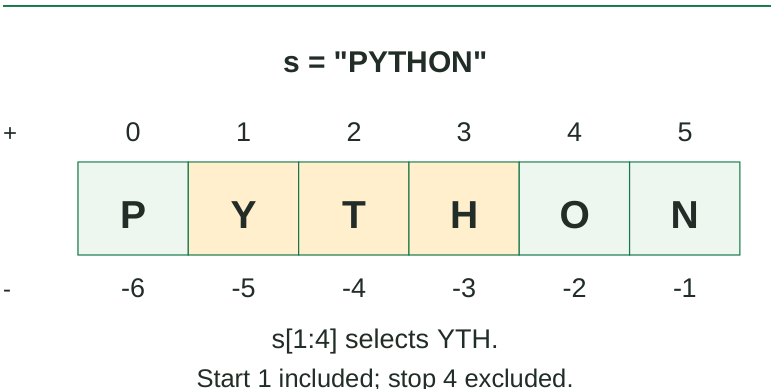
Diagram explanation: The highlighted Y, T and H occupy indices 1, 2 and 3. A slice includes its start and excludes its stop. Negative indices count backward from the end.
s = “PYTHON” print(s[0], s[-1]) print(s[1:4]) print(s[:2], s[4:]) print(s[::2]) print(s[::-1])Output
P N YTH PY ON PTO NOHTYPSlice notation: s[start:stop:step]
| Part | Meaning | Example |
|---|---|---|
| start | First included position | s[1:4] starts at index 1 |
| stop | Excluded boundary | s[1:4] excludes index 4 |
| step | Movement between selected positions | s[::2] selects every second character |
| Omitted bounds | Defaults depend on the step direction | s[:] returns the full string value |
| Negative step | Moves through positions in reverse | s[::-1] reverses the string |
Boundaries and errors
An individual out-of-range index, such as s[6], raises IndexError. Slicing tolerates bounds beyond the string: s[:99] returns the available text. With a positive step, s[4:2] is empty. A slice step of zero raises ValueError.
Application: a structured batch identifier
batch_id = “LOT-2026-A07” print( batch_id[:3], batch_id[4:8], batch_id[-3:] )Output
LOT 2026 A07These positions work because the example uses a fixed, documented format. If real identifiers have variable lengths or separators, fixed slicing may extract the wrong information.
Memory aid
Start included, stop excluded. Before writing a slice, mark character positions and predict the selected substring.
1.12 String methods and controlled text cleaning
A method is called using an object followed by a dot, such as text.strip(). Most string-transforming methods return a new string. Searching and testing methods may return an integer or Boolean; split() returns a list of substrings.
| Method | Role | Example result |
|---|---|---|
| strip() | Remove leading/trailing whitespace | ” B07 “.strip() -> “B07” |
| lower() / upper() | Change letter case | “Mg”.lower() -> “mg” |
| replace(old, new) | Replace matching substrings | “A-07”.replace(“-“, “”) -> “A07” |
| find(sub) | First matching index; -1 if absent | “BATCH”.find(“T”) -> 2 |
| count(sub) | Count non-overlapping occurrences | “banana”.count(“an”) -> 2 |
| startswith() / endswith() | Test a prefix/suffix | “LOT-07”.startswith(“LOT”) -> True |
| split(separator) | Break text into substrings | “A,B”.split(“,”) -> [“A”, “B”] |
| separator.join(parts) | Join an iterable of strings | “-“.join([“A”, “07”]) -> “A-07” |
Worked cleaning example
raw_id = ” batch-a07 ” clean_id = raw_id.strip().upper() print(f”Raw: [{raw_id}]”) print(f”Clean: [{clean_id}]”) print(clean_id.startswith(“BATCH-“))Output
Raw: [ batch-a07 ] Clean: [BATCH-A07] Truestrip() removes whitespace at the ends; it does not remove the interior hyphen. upper() applies the chosen uppercase convention. Chaining methods applies them left to right to successive results. Square brackets in the display make the original spaces visible.
Transformation results:
- Original text: [ batch-a07 ]
- After strip(): [batch-a07]
- After upper(): [BATCH-A07]
- After replace(“-“, “”): [BATCHA07]
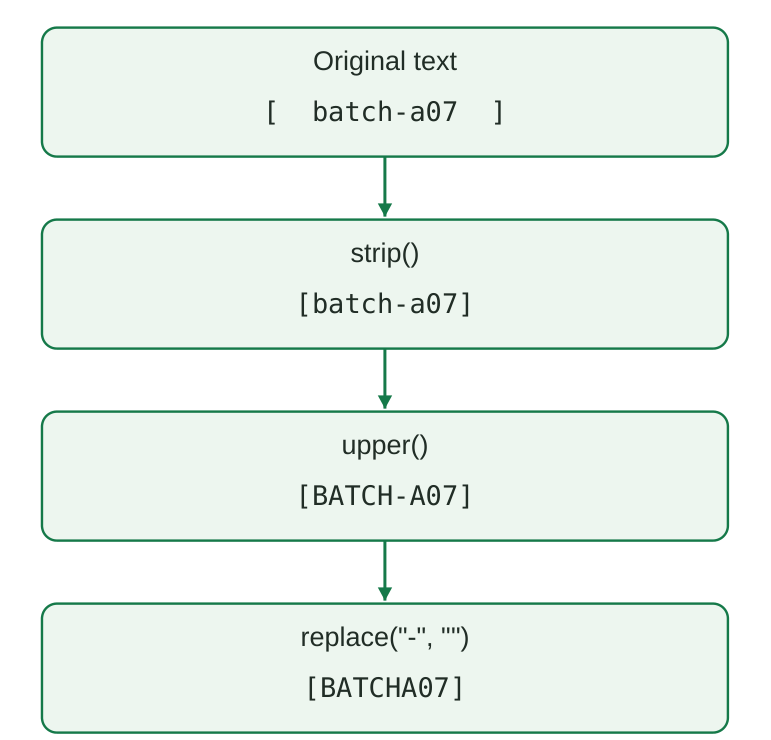
Diagram explanation: Each arrow applies the labelled method to the preceding result. strip() removes end spaces, upper() changes letter case, and replace(“-“, “”) removes the hyphen. Each result is a new string. The replace step is optional and should be used only when the identifier rules permit it.
Important limitations
- find() returning -1 means no match; index() instead raises ValueError when the substring is absent.
- strip(“mg”) removes any of the characters m or g from the ends; it does not mean “remove the exact unit suffix”. Use a clearly understood method for the actual format.
- Do not delete punctuation, spaces or case distinctions merely to make identifiers look uniform. Different records may become indistinguishable.
Practice: clean ” sample-b02 ” into “SAMPLE-B02” and test its prefix. Then explain why cleaning “Sample A” into “SampleA” may change the intended identifier.
1.13 Standard libraries and third-party libraries
A module is a unit of importable Python code. A package organises related modules; “library” is a broad term for reusable functionality. The standard library accompanies Python. Third-party libraries are supplied separately and installed into the chosen environment.
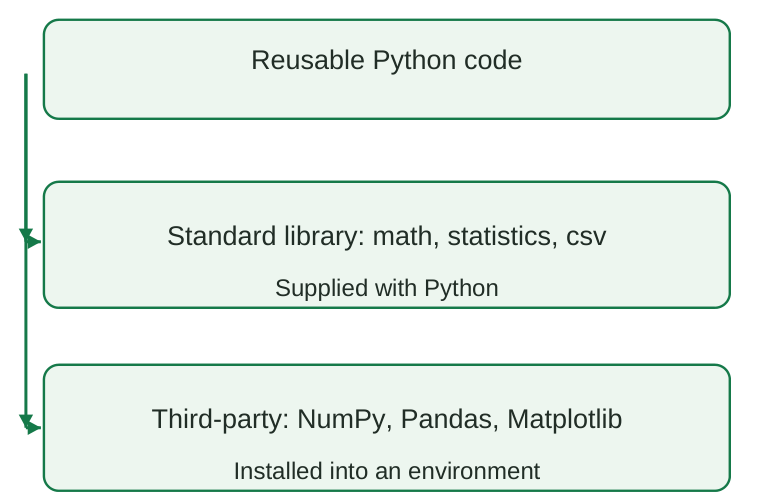
Diagram explanation: Both categories provide reusable code. Standard-library modules are supplied with Python; third-party distributions must be installed into the environment before they can be imported.
| Standard module | Typical purpose | Pharmaceutical-data relevance |
|---|---|---|
| math | Mathematical functions and constants | Square roots and numeric checks |
| statistics | Basic descriptive statistics | Mean of illustrative measurements |
| datetime | Dates and times | Recording laboratory dates |
| csv | Delimited-text data | Later reading/writing tabular records |
| decimal | Decimal arithmetic with configurable precision | Explicit decimal calculations |
Importing and using a module – step by step
Step 1: Open a .py file or notebook code cell.
Step 2: Import the module with import math.
Step 3: Call its function using math.sqrt(81).
Step 4: Use print() to display the result, as shown below. math belongs to the standard library, so no pip installation is required.
import math print(math.sqrt(81))Output
9.0The dot qualifies a name: math.sqrt identifies sqrt from the math module. For a basic statistics example, statistics.mean([10, 12, 14]) gives 12 after import statistics; the bracketed values form a list, studied in Unit III. Installing and importing are different operations.
from decimal import Decimal a = Decimal(“0.1”) b = Decimal(“0.2”) print(a + b)Output
0.3Create Decimal values from text when an exact representation of the specified decimal input is required. Decimal arithmetic has its own precision context; it is not a promise that every possible calculation is exact.
Third-party examples:
- NumPy supports arrays and numerical operations (Unit III).
- Pandas supports structured data, cleaning and aggregation (Unit IV).
- Matplotlib supports plots and graphical interpretation (Unit V).
Namespace discipline
Use clear imports such as import math. Avoid from module import * in teaching examples because the origin of names becomes harder to identify.
1.14 Installing, inspecting and uninstalling packages
pip is a package installer. python -m pip runs pip belonging to that Python interpreter. Prefer a project-specific virtual environment so that one project’s packages do not interfere with another.
Create an isolated project environment – step by step
Step 1: Open the project terminal. Open a terminal in BPharm_Python. Confirm that the Python command works.
Step 2: Create .venv. Run the following command. It creates a local environment folder; it does not install NumPy yet.
Terminal command – replace python with py or python3 if needed
python -m venv .venvStep 3: Install into that environment. Use its interpreter explicitly, with the command for the operating system below. This avoids an activation step and makes the package destination clear.
Platform-specific terminal alternatives – use one appropriate line
# Windows PowerShell: .\.venv\Scripts\python.exe -m pip install numpy # macOS/Linux terminal: .venv/bin/python -m pip install numpyStep 4: Connect the IDE. Select the Python interpreter inside this project’s .venv folder in PyCharm or VS Code. For notebooks, select the corresponding kernel. The editor and installer must use the same environment.
Step 5: Verify. In that environment, execute import numpy, then print(numpy.version). A version string confirms the module can be imported. Its exact number depends on the installed release.
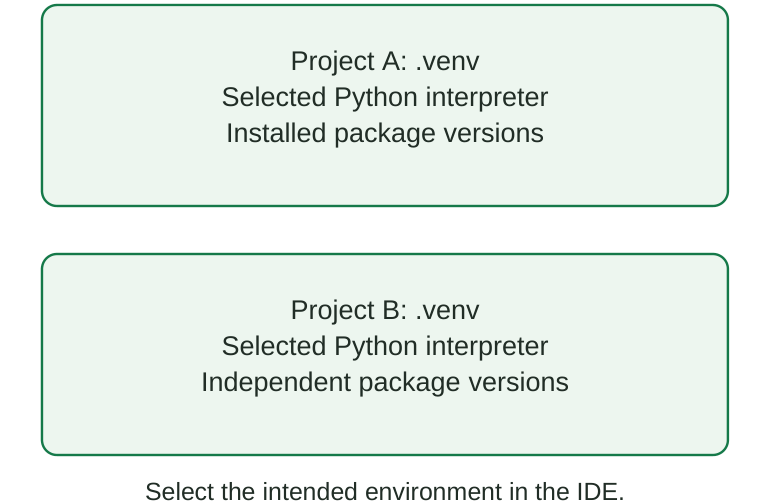
Diagram explanation: Each project can have its own interpreter environment and package versions. Installing into Project A does not automatically make a package available in Project B.
- Project A: its own .venv, selected Python interpreter and installed package versions.
- Project B: its own .venv, selected Python interpreter and independent package versions.
- Select the intended environment in the IDE.
Using .venv as a Jupyter kernel
Step 1: Use the environment interpreter. In the commands below, replace python with ..venv\Scripts\python.exe on Windows or .venv/bin/python on macOS/Linux. Run them from the project folder.
Step 2: Install the kernel backend. Run:
Terminal – use the .venv interpreter path
python -m pip install ipykernelStep 3: Register a kernel. Run the following command. It registers this environment under the name bpharm. Use a different name for another project.
Terminal – use the .venv interpreter path
python -m ipykernel install –user –name bpharmStep 4: Select and test. Open Jupyter, select the registered bpharm kernel in the notebook kernel menu, then execute import numpy. If this runs without ModuleNotFoundError, that kernel can access NumPy.
Package-management command reference
| Package command | Purpose |
|---|---|
| python -m pip –version | Show pip and its installation location |
| python -m pip install numpy | Install a third-party distribution |
| python -m pip show numpy | Inspect installed package information |
| python -m pip list | List installed distributions |
| python -m pip install –upgrade numpy | Upgrade the package in this environment |
| python -m pip uninstall numpy | Remove it after confirming the prompt |
| python -m pip freeze > requirements.txt | Record installed requirement versions |
| python -m pip install -r requirements.txt | Install versions from a requirements file |
In the table, python means the selected environment interpreter; substitute its explicit path where appropriate. A requirements file records packages, not the project code or every operating-system dependency.
Uninstall a package – step by step
Step 1: Choose the same environment. Use the interpreter that installed the package.
Step 2: Run python -m pip uninstall numpy, substituting the .venv interpreter path when needed.
Step 3: Read the prompt and enter y to confirm removal after checking the package name.
Step 4: Run python -m pip show numpy; if NumPy was removed, pip reports that the package was not found. Restart a running notebook kernel before checking imports after removal.
After installation
Select the same environment in PyCharm/VS Code or the corresponding Jupyter kernel, then try import numpy. In an IPython/Jupyter code cell, %pip install numpy targets the current kernel environment; %pip is notebook magic, not normal Python script syntax.
ModuleNotFoundError: check the interpreter/kernel and package installation. Do not name a program file numpy.py or math.py; it can shadow the intended module. Standard-library math does not need pip installation.
1.15 Worked application: an annotated laboratory result
Problem: an illustrative laboratory sample contains 375 mg of solute in a final solution volume of 75 mL. Create a clean sample identifier, calculate mass concentration and print a labelled report. These numbers demonstrate arithmetic only.
Plan the calculation
| Input / result | Representation | Reason |
|---|---|---|
| Raw sample identifier | str | It is a label, not a quantity |
| Mass in mg | float | Measurement may be fractional |
| Final volume in mL | float | Measurement may be fractional |
| Concentration in mg/mL | float | Mass divided by final volume |
| Printed report | str | Combines text, numeric formatting and units |
Run this worked example – step by step
Step 1: Create lab_result.py in the practice folder, or use a new notebook code cell.
Step 2: Enter the complete program below in order.
Step 3: Save and run the .py file using the selected IDE/interpreter, or execute the notebook cell.
Step 4: Compare each output line with the expected output.
Step 5: Manually check 375 / 75 = 5 mg/mL before interpreting the report.
Complete straight-line program
raw_id = ” sample-a03 ” sample_id = raw_id.strip().upper() mass_mg = 375.0 final_volume_ml = 75.0 concentration = ( mass_mg / final_volume_ml ) print(f”Sample: {sample_id}”) print(f”Mass: {mass_mg:.1f} mg”) print( f”Final volume: ” f”{final_volume_ml:.1f} mL” ) print( f”Concentration: ” f”{concentration:.2f} mg/mL” )Output
Sample: SAMPLE-A03 Mass: 375.0 mg Final volume: 75.0 mL Concentration: 5.00 mg/mLExplain each stage
- Prepare text: strip() removes external whitespace and upper() applies the naming convention.
- Represent measurements: unit-bearing variable names show what the numbers mean.
- Process: 375 / 75 = 5. Units reduce to mg/mL. The denominator is final solution volume, not an unlabelled number.
- Report: f-strings display the identifier and measured quantities. Formatting to two decimal places does not establish measurement precision.
Independent check and limitations
A manual check gives 5 mg/mL; multiplying 5 mg/mL by 75 mL returns 375 mg. The program assumes a positive non-zero volume and valid quantities. This straight-line example does not validate all inputs or replace a laboratory calculation procedure.
Practice exercise
Identify the statements that clean text, perform arithmetic and format output. Change one quantity, predict the new result manually, and then execute the program to verify the prediction.
1.16 Quick revision and common misconceptions
| Concept | Remember |
|---|---|
| Interpreter | Executes Python code; an editor is a different tool |
| Variable | A name bound to an object; use meaningful unit-aware names |
| int / float | Whole-number object / approximate floating-point object |
| str / bool | Text / True or False |
| = versus == | Assignment versus equality comparison |
| input() | Always returns a string for a successfully read line |
| / versus // | True division versus floor division |
| and / or / not | Both / at least one / reverse truth, for Boolean values |
| Index / slice | One character / selected substring |
| String mutation | Transformations produce new strings |
| Install / import | Make package available / access module in code |
| Environment | Selected interpreter and packages must agree |
Predict before running
| Expression | Correct result | Reason |
|---|---|---|
| “10” + “2” | “102” | Concatenation |
| int(“10”) + 2 | 12 | Numeric addition |
| 7 // 2 | 3 | Floored quotient |
| -7 // 2 | -4 | Floor toward negative infinity |
| bool(“False”) | True | Non-empty string |
| “PYTHON”[1:4] | “YTH” | Stop boundary excluded |
| ” B07 “.strip() | “B07” | External spaces removed |
| 2 + 3 * 4 | 14 | Multiplication evaluated first |
Error diagnosis reference
| Error | Typical cause | First check |
|---|---|---|
| SyntaxError | Broken quotes, invalid statement | Read the indicated source line |
| NameError | Name not assigned or misspelled | Spelling and execution order |
| TypeError | Incompatible operands | Types of both operands |
| ValueError | Unsuitable conversion text | Input content and target conversion |
| IndexError | Position outside string bounds | Length and valid index range |
| ZeroDivisionError | Zero denominator | Quantity and formula |
| ModuleNotFoundError | Module unavailable to this interpreter | Environment and installation |
Four useful memory rules
- Count-measure-label-flag: int-float-str-bool.
- Start included, stop excluded.
- Install first, import when needed.
- Predict, run, compare and explain.
1.17 Examination practice
Short-answer questions
- Define Python interpreter, IDE and notebook kernel.
- State four advantages of an IDE over a plain text editor.
- Distinguish int, float, str and bool with pharmaceutical-data examples.
- Explain type casting and the difference between = and ==.
- Distinguish /, // and % using positive and negative numbers.
- Why does input() require conversion for numeric arithmetic?
- Explain string immutability and start/stop slice boundaries.
- Distinguish a standard-library module from a third-party package.
Long-answer and diagram questions
- Explain a complete Python-and-IDE setup, verification and first-script workflow.
- Explain arithmetic, comparison and logical operators with outputs and precedence.
- Draw an input-conversion-output flowchart and write its matching program.
- Explain basic string operations, indexing, slicing and cleaning with examples.
- Explain package installation/uninstallation and why environment selection matters.